
Thatched Roof
Overview
This site is under construction. You will find detailed information not before summer 2016.
Theoretical considerations, specifications and drafts for construction
Graphical representation and principle construction of a thatched roof
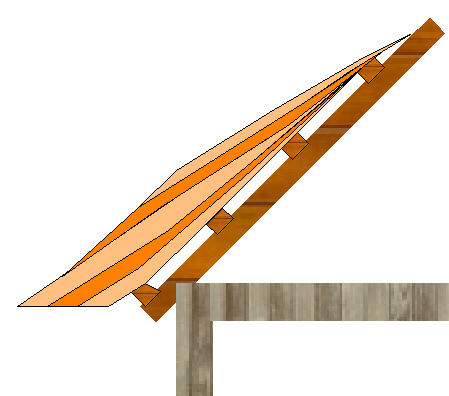 For the long-term durability of a thatched roof are several factors critical. The used material must be in proper condition and clear of pollution of course. The reed culms must lie tightly on top of each other and shape a smooth surface, but must not be squashed. The thatched roof should have a pitch of 45° at least, so that rainwater drains off quickly. Furthermore it is important, that the thatched roof after rainfalls dries off quickly. Therefore is ideal an airy, sunny place. Finally air should reach the roof not only from the outside but also from the inside. Therefore it must be back-ventilated. On the roof truss is a counter lathing brought up crosswise, on which the thatched roof is fixed. The reed culms are brought up in blocks. At first a layer of circa 10 cm is fixed, on this are slight thinner layers brought up, so that a total roof thickness of circa 30 cm is present in the end. The reed culms are all to align equally. The thicker end comes earthwards, the tip shows towards ridge. The lowest conter batten is thicker than the remaining. By this ‚protrusion‘ and the slight tapering of the reed culms to the top the culms are slightly curved inwards, after they have been fixed to the counter batten. The convex side points inwards. By elasticity and tension of the culms these are pressed tightly to the roof, so that this is mechanical stable permanently.
view from above
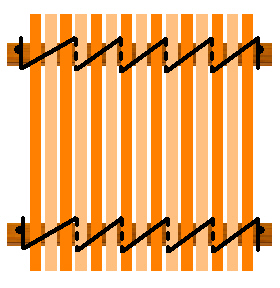 Depicted is a counter lathing (here two beams), on which the reed culms rest. A layer reed culms (circa 10 cm thickness) is now running fixed with a wire over a length of circa 50 cm. At first the wire is once wound around the counter batten from above and then knotted. Then you conduct the wire from above across the reed culms over a length of circa 10 cm, then go around below the counter batten (shown dashed) and tighten firmly the wire, so that the crossed reed culms are pressed tightly to the counter batten. This procedure will still be repeated four times, before the wire is coiled around the counter batten for the last time and the end is knotted. The reed culms are attached, using this method, to each counter batten, which they lie on. The next reed layers are fixed similarly.
view from sidewards
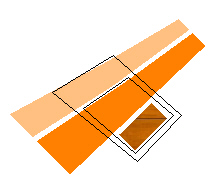 Once more a draft from sidewards. Also pictured is a counter batten, around which runs the fixing wire. At first the lower reed layer (orange) is fixed in the manner described, then is the next reed layer (yellow) fixed likewise.